Sign-In Settings
Enabling Multi-factor Authentication and Single Sign-On for Veza
If your organization uses an Identity Provider (IdP) for Single Sign-On (SSO), you can integrate Veza with your IdP to centralize user management and access controls. This document provides an overview of Veza's SSO capabilities, including:
Overview
Veza supports SAML, the XML-based standard for single-sign-on. When enabled, users can log in to Veza using a third-party Identity Provider, such as OneLogin, Okta, Azure AD, or a custom provider.
After registering Veza as a SAML service provider (SP) with your IdP and configuring the connection from Administration > Sign-in Settings, you will be able to assign access to Veza directly from the IdP. The login page will offer the option to "Login with SSO" and redirect users to your IdP for authentication.
SSO flows can be:
Service Provider-initiated: Users log in at the Veza home page (
yourorg.vezacloud.com)Identity Provider-Initiated: Users log in to Veza via their IDP app dashboard (such as your organization's Okta Portal)
For a step-by-step guide to configure SAML SSO for Okta, which may be adapted for other providers, please see SSO For Okta. Instructions are also available for AzureAD.
Single Sign-On for Access Reviewers
Using Single Sign-On in combination with a Global Workflows Identity Provider, Workflow certification reviewers can be auto-assigned using Identity Provider metadata and log in to Veza using SSO to act on their assigned certifications. As the default role for SSO users is access_reviewer, this will enable limited access for all users in your organization, without exposing other Veza features or certifications the user is not involved in.
When configuring the SAML settings for a new app, ensure that user's Veza application username is the same as their username for the IdP. This will allow Veza to correctly identify and authenticate managers who are auto-assigned.
Enabling Multi-Factor Authentication
You can enable 2-factor authentication under Administration > Sign-in Settings. When enabled, ALL your Veza users will be prompted when they first log in to register an authenticator app by scanning a QR code and entering the one-time code (Google Authenticator for Android or iOS).
Note that if you enable, disable, and then re-enable MFA, you will need to have your original authenticator configuration to log back in. If you no longer have the original pair in your authenticator app, you will need to initiate the recovery process (providing the one-time recovery code created during initial MFA registration) to regain access.
Enabling SAML SSO
Prerequisites: To enable SSO, your Identity Provider and Veza must both be configured to establish the trusted connection:
You'll need administrator access to your IdP and Veza.
You'll need your IdP Sign-in (Log-in) URL and X.509 SAML Certificate.
Your IdP must support the SAML 2.0 standard.
The SAML
NameIDused by the IdP must contain the user's email address.
You can download service provider (SP) metadata from Veza to reference when configuring the connection in your Identity Provider. When configuring your IdP, you should retrieve an X.509 certificate and the Single Sign-On URL, which Veza will need to enable SSO.
The following order of operations is recommended:
Connect to your identity provider to get the required IdP SAML metadata. You will need the X.509 certificate, Sign-In URL, and SAML request protocol binding. You will also need the signing request algorithm and digest, unless your IdP doesn't support signed requests.
Log in to Veza using your administrator username and password. Navigate to Administration > Sign-in Settings, and choose to enable SAML. Click "Configure."
Complete the required fields, save the configuration, and download the service provider (SP) metadata.
Log in to your Identity Provider (IdP), and use the SP metadata from Veza to register a new SAML service provider.
Enable the SSO connection from Veza Administration > Sign-in Settings panel
See Veza Configuration and Identity Provider Configuration below for details on the information you will need to provide at each step.
Configure Veza for Single Sign-On
1. Create a new SAML connection
You can download SP metadata from Veza, which contains information you'll need to set up SSO within your IdP. First, you'll need to save a new SAML configuration from Administration > Sign-in Settings. You will need to provide the following information:
| Field | Details |
|---|---|
IdP Sign-in URL | Provide the IdP sign-in URL used to access your company portal. |
X509 Signing Certificate | `Upload the SAML public certificate (X.509) used to verify the IdP (Base64 Encoded String). |
Sign Request Algorithm | The signature algorithm used to sign SAML AuthnRequest messages sent to the Identity Provider. Valid values are: |
Sign Request Algorithm Digest | The digest algorithm used to digitally sign the SAML assertion and response. Valid values are: |
SAML Request protocol binding: (HTTP-POST or HTTP-Redirect) | Select the binding to be used by the IdP when sending the SAML Response XML, literally: |
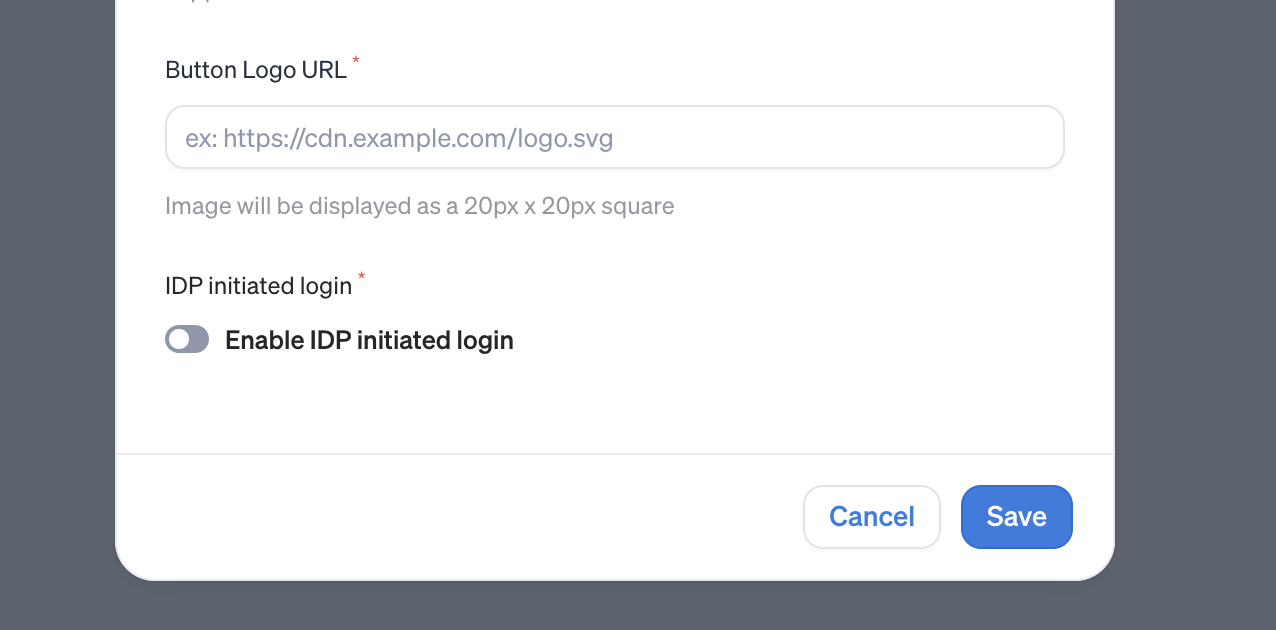
Enable IdP Initiated Login | Allows IDP-initiated sign-in requests |
Button Logo URL | The graphic you upload will appear on the Veza “Continue with SAML SSO” button on the log-in screen. |
Issuer ID | The URL that uniquely identifies your identity provider in the SAML assertion, e.g. |
2. Enable Identity Provider initiated Single Sign On (optional)
When enabled, authorized IdP users accessing Veza via the IdP app portal will be logged in automatically.
3. Download the service provider metadata
Once you have saved the SSO configuration, you can download service provider metadata for Veza in SAML format. This information can be imported into most identity providers or used for reference if you need to input the values manually.
4. Enable or Disable an SSO connection
Enable the SAML connection from the Authentication panel after you have finished registering Veza with your Identity Provider (see below). Once enabled, visitors to your Veza instance will have the option to log in with a username/password or authenticate via the IdP sign-in URL.
Configure Identity Provider for Single Sign-On
The exact steps to create a new integration vary depending on your IdP. Typically, you will need to register a new application or service provider, and specify the Single Sign-On URL assigned for your Veza instance (responsible for handling SAML assertions).
Contact your Veza support team for the address to provide as the Single Sign-On URL, which should look like:
https://<Veza-Auth0-URL>/login/callback?connection=saml-<Customer-name>-cookie-connectionProvide
urn:auth0:<Veza-auth0-instance-name>:saml-<customer-name>-cookie-connectionas the Service Provider Entity ID (update the values in brackets to match your SSO URL)
If your IdP supports automatic configuration, you can download service provider metadata after saving the SAML configuration in Veza, to import when registering the app in your IdP.
If you want to enable Single Logout, you should do so after creating the connection in Veza, and obtaining the SLO Url, SP Issuer (SP Entity ID), and the SP Certificate from Veza's SP metadata.
For additional resources on adding a new SAML provider with common IdPs, you can refer to the standard documentation for AzureAD, Okta, and Google.
Managing SAML users
After configuring a SAML identity provider, you can manage Veza users from your Identity Provider by assigning an IdP user or group to the Veza application. The first time a user logs in to Veza with SSO, a local Veza user account is created and shown on the Administration > User Management page.
Notes:
IdP user passwords cannot be changed from the Veza UI
No account creation email will be sent until the user first logs in. You may want to inform users they can now access Veza using their IdP credentials.
You should retain a Veza admin account configured for password authentication, to use if the SSO connection is disrupted.
Teams with Single Sign-On
When configuring SSO for Veza, you can set the default roles for users, and add role mappings to assign federated users to Veza roles based on groups defined in a SAML claim from your identity provider.
Veza can provision user accounts based on:
The default root team role.
A SAML attribute containing assignments that map to Veza team roles. By default, Veza will use the
groupsattribute. Alternately, you can specify a custom attribute (such asroles) when configuring the SSO connection on Veza.
To assign users to non-root teams based on an Identity Provider role assignment, the SAML token must include an attribute with the role or group assignments when the users log in to the Veza app. See Example SAML Attribute Mapping Configuration for the expected syntax.
Default Roles
To configure default roles for federated users, go to Sign-In Settings > Configure SSO > Role Mapping. Users that log in with single sign-on are assigned to the root team with the default role in the Veza SSO configuration, or a role defined in the SAML claim from the identity provider.
Find Default Role mapping and change it to
Admin,Operator, orReviewer.
New users will have this role when no other assignment is provided. If the SAML token contains a team and role assignment, it will be used instead.
Role Mapping for Single Sign-On
To assign users to Veza roles based on assignments within your Identity Provider, go to Veza Settings > Sign-In Settings. Find the Enable SSO section and click Configure. Scroll to the Role Mapping section.
The Attribute is the SAML Attribute Statement containing the information used by Veza to assign or update the Team and Role for a user when they log in. If this is not set, Veza will use the
groupsstatement for role assignments.The Mapping is part of the information sent in the SAML Attribute Statement containing the information used by Veza to assign or update the Team and Role in Veza. This Mapping value is a case-sensitive match with the value in the SAML Response.
The value of the SAML Attribute Statement must be in the format of
{Team SSO Alias}:{Role}, or{Role}(for root team role assignments).To delete a mapping, click the trash can icon in the actions column.
Veza can assign users to default or custom teams with a viewer or operator role based on an incoming SAML claim from your identity provider.
To assign a federated user to a Veza team and role, the values must be in the format <team>:<role>, where <team> is the SSO Alias of the team and <role> is one of admin, operator, or viewer, or an equivalent IdP role defined in the SSO Role Mapping. The field can contain a comma-separated list of teams and roles.
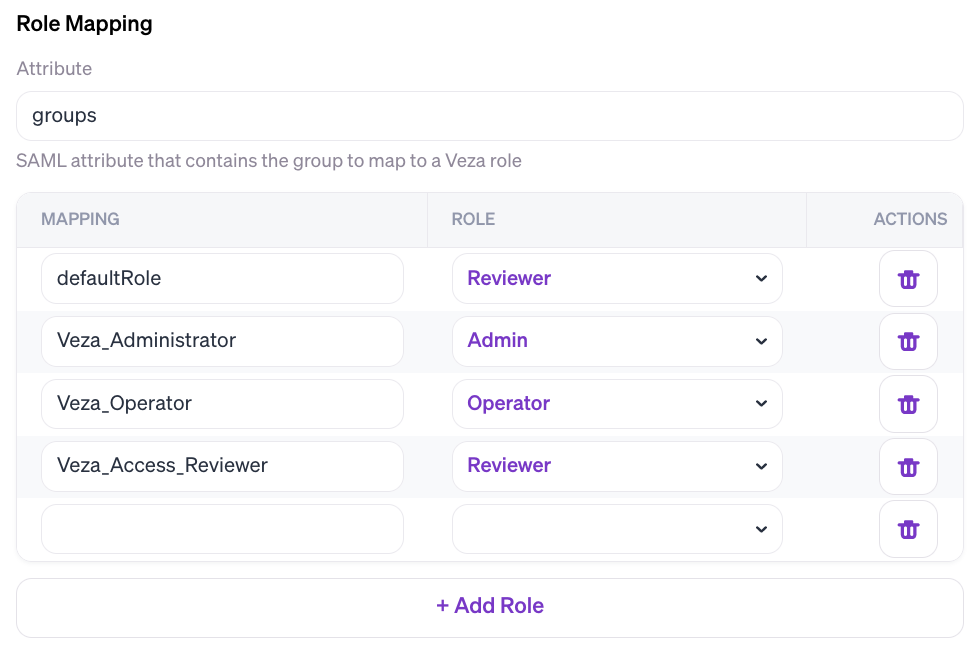
Example SAML Attribute Mapping Configuration
In this image, Veza is configured to expect roles assignments in the SAML groups attribute, including mappings of IdP roles to Veza roles:
With this configuration, users can be assigned to teams with the following SAML attribute statement values:
| Team | Role | SAML Attribute Statement Value |
|---|---|---|
Root | Admin |
|
Root | Operator |
|
Root | Access Reviewer |
|
Custom Team | Viewer |
|
Custom Team | Operator |
|
Multiple | Multiple |
|
Some combinations are ignored, specifically:
Team1:adminis ignored because non-root teams don’t support admin role.UnknownTeam:vieweris ignored because the team is not recognized.Team1:unknown_roleis ignored because the role is not recognized.operatoris ignored, unless Veza is configured to add users to the root team by default.
Troubleshooting SAML Role Assignments
Ensure that your Identity Provider includes the claim in the SAML token. This is typically configurable on a per-application basis, for example:
Attribute names and values are case-sensitive; confirm that mapping is correct on the Veza Configure SSO page.
Enabling or disabling IdP-managed role assignments
Depending on Veza system settings, group assignments in your IdP can take precedence over changes to teams or roles made by an administrator on the Veza User Management page.
To change this setting, find the Identity Provider Managed Roles option under Veza Sign-in Settings:
Go to Veza Settings > Sign In Settings and find Identity Provider Managed Roles.
When this option is disabled, any assignments based on IdP roles only apply the first time a user logs in.
When enabled, user management within Veza is prevented, and your identity provider is the single source of truth for Veza teams and roles.
Click the toggle to enable or disable the setting.
This option is enabled by default for new customers. Disable it if you prefer to use Veza's internal settings or do not use your identity provider for role management.
If disabled, you should configure role forwarding for your Identity Provider before opting in. See Role Mapping for Single Sign On for the expected values.
Last updated