Get Started: Workflow Operator
Welcome to Veza Access Reviews! This guide is meant to help certification owners and administrators create and manage Workflows and Certifications.
Introduction
Access Reviews leverage the Veza Authorization Graph to enable governance, risk, and compliance workflows for any authorization relationship. Two key concepts that are important to understand when using the product:
Workflows: Access Review configurations that define the scope of an audit, along with scheduling, integration, and notification settings.
Certifications: individual instances of access review based on data at the time of certification creation. Teams can use the Certification view to approve or reject line items and sign off on decisions.
See the following sections to create your first Workflow, start a Certification, and assign and review the results. For an orientation intended for users logging in to approve or reject access for the first time, see theAccess Reviewer's Guide
Requirements
You will need an account with the
administratororoperatorrole to manage Access Reviews.The relationships available for review depend on the Integrations added to Veza. This guide assumes you've already added an identity provider, cloud service provider, or other data sources to review.
When configuring Orchestration Actions and Reminders, the possible destinations depend on which external apps and Webhooks are enabled.
By default, you can choose reviewers from the list of system users. This can be extended to include any user in your organization after configuring Workflows Global IdP Settings.
Create a Workflow
To manage and create Workflows, go to the Access Reviews section. Click New Workflow to begin. A Workflow defines the scope of a periodic or one-time access or entitlement review, including:
A Query defining the entities and relationships under review
Default Notification and Orchestration Action settings, inherited by all future certifications for that workflow
Basic attributes such as name and description for identification and internal reference.
See Workflow Builder for more details.
Step 1: Choose a Source and Destination
A workflow query includes a source entity type and a destination entity type. The Certification shows all entities of the source type that are related to entities of the destination type, for review and sign-off. To begin, choose a single entity type (such as users from your identity provider). Then choose a destination.
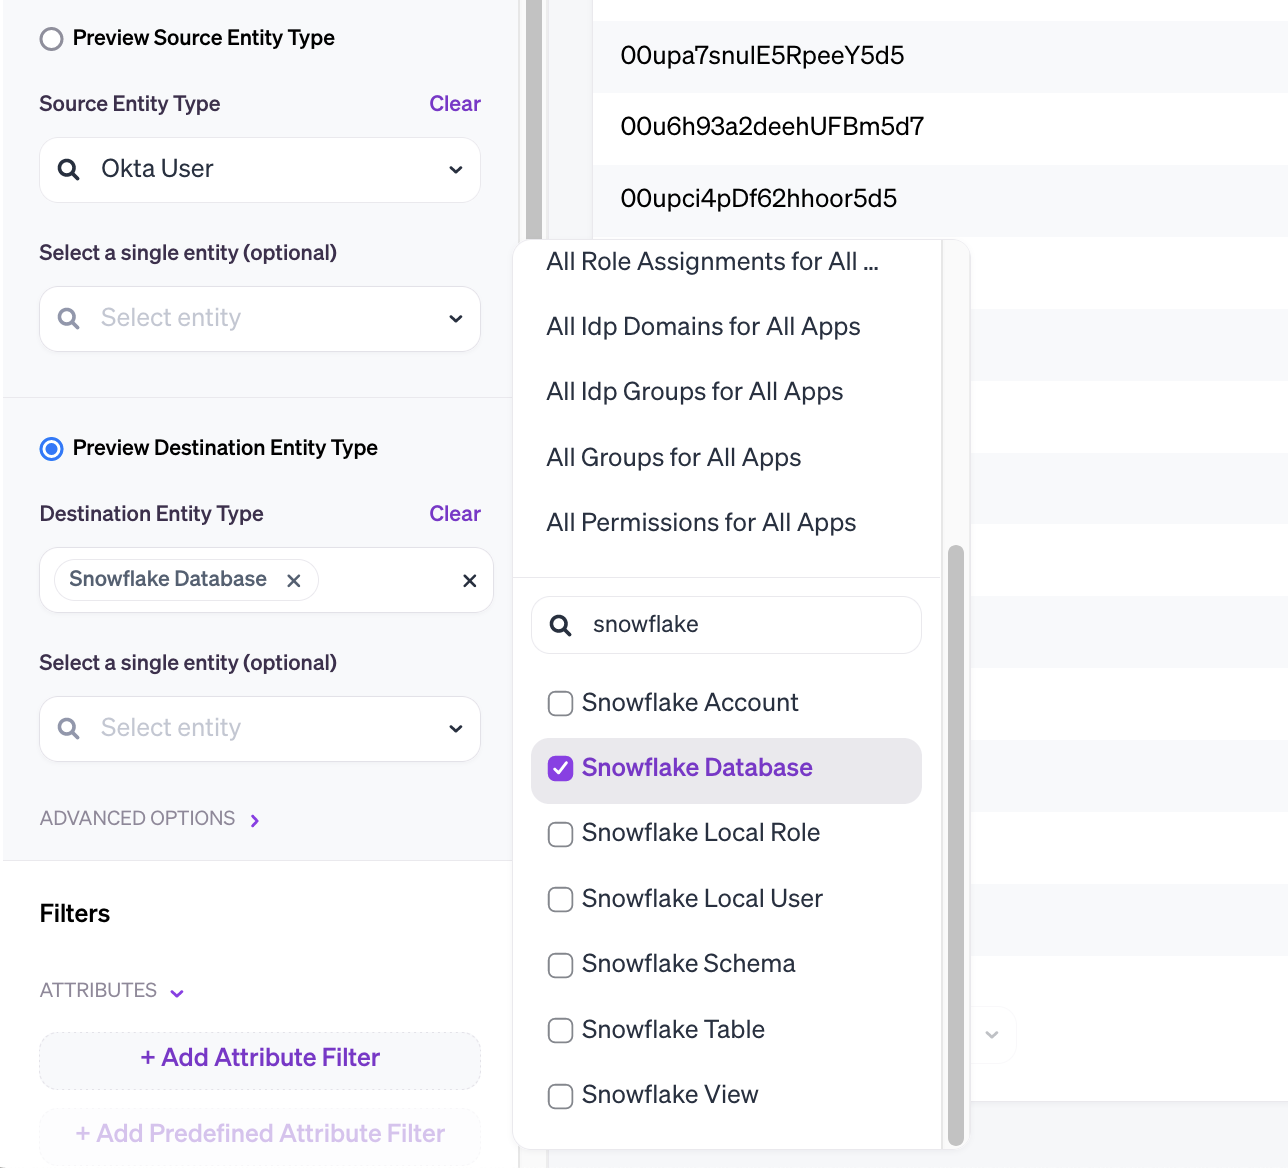
Go to Access Reviews > Create Workflow to open the Workflow builder.
Choose a source entity type. Typically, you'll want to review relationships for an entity type that corresponds to corporate identity, such as Okta or Microsoft Azure AD Users.
Choose a destination entity type. By default, the supertype All Resources is selected. You can change this to a specific resource type or multiple resource types. To get started, choose a single data source type to review permissions on:
The destination can be a data resource or a related IAM/RBAC entity such as a role or group. Depending on your needs, you can adjust the source entity to review granular resource permissions or entitlements such as group/role assignments. You can also reverse the query, for example, to certify S3 buckets accessible by Okta Users.
See Workflow Queries for more information about the Access Reviews search interface.
Step 2: Add Filters
Applying filters narrows the scope of a Certification to find exactly the relationships and entities you want to review. Filters can apply to any attribute Veza has collected for entities in the search.
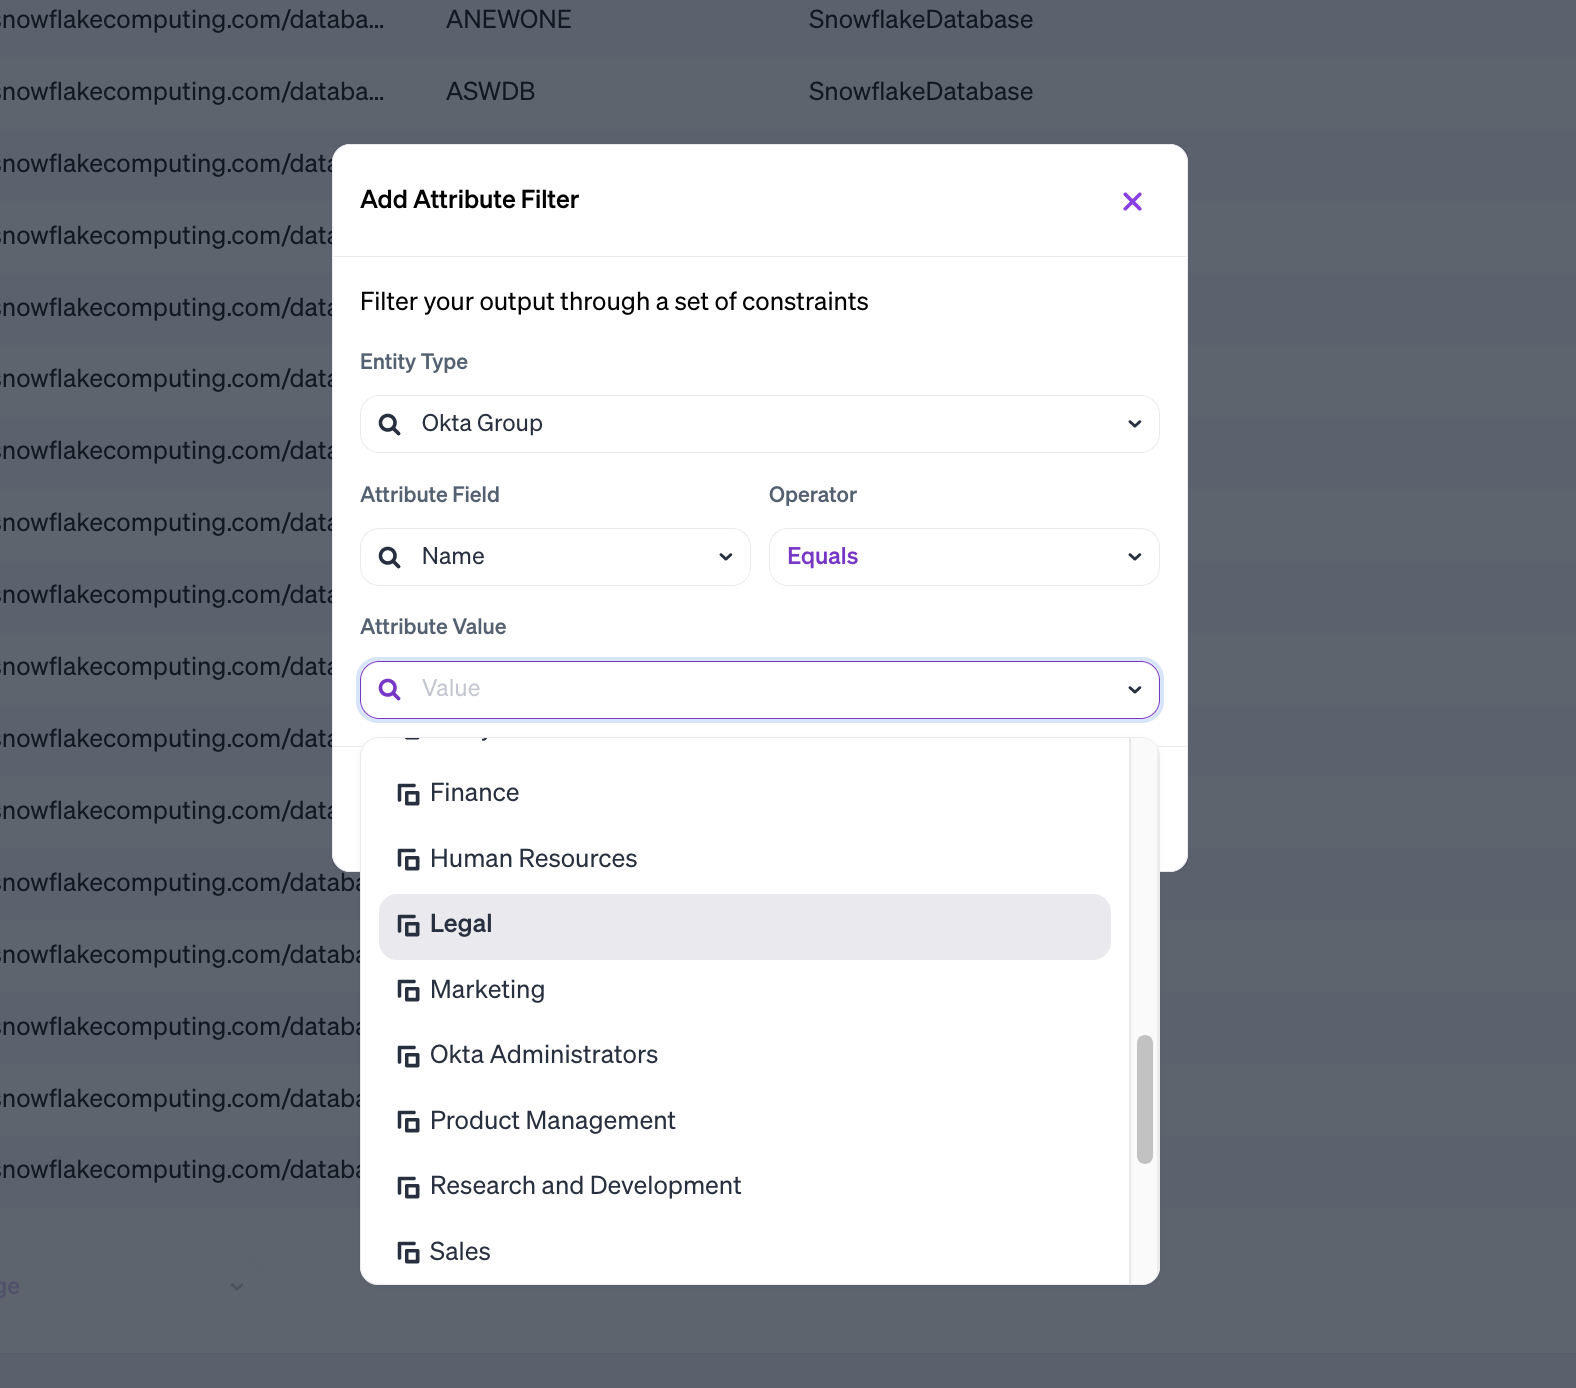
For example, to only show access for users in the "Legal" Okta Group:
Click +Add Attribute Filter Group.
Choose the Entity Type to apply the filter to.
Choose from possible Attribute Fields available for that entity type.
Choose an Operator, such as "less than" or "equals".
Choose an Attribute Value from the dropdown. It will auto-complete when searching the
Namefield, or you can enter any value.
Workflow queries can be very broad or very specific, including filters on tags and permissions. See Filters for more information.
Step 3: Add optional Summary Entities for additional context
Sometimes, Reviewers will need additional information about how access is granted to make informed decisions about a source-destination pair. Adding Summary Entities enables an additional column to show intermediate relationships in the path connecting the source and destination entity.
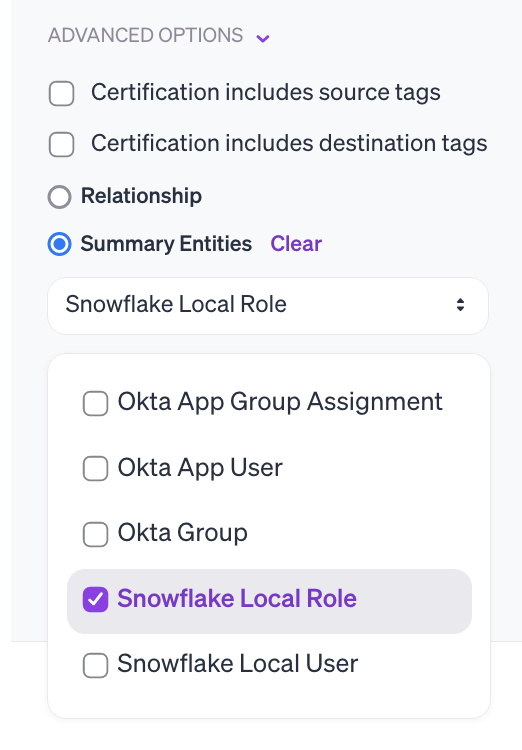
Expand the query Advanced Options.
Select Summary Entities and use the dropdown to choose from possible intermediate entities.
For example, you might be interested in both an Identity Provider Group and a local Role enabling access to a data system:
Note that using Summary Entities will change the total number of results, and show a row for each unique source and destination path. See Certification Presentation Options for more information.
Step 4: Edit Workflow Notifications and Reminders
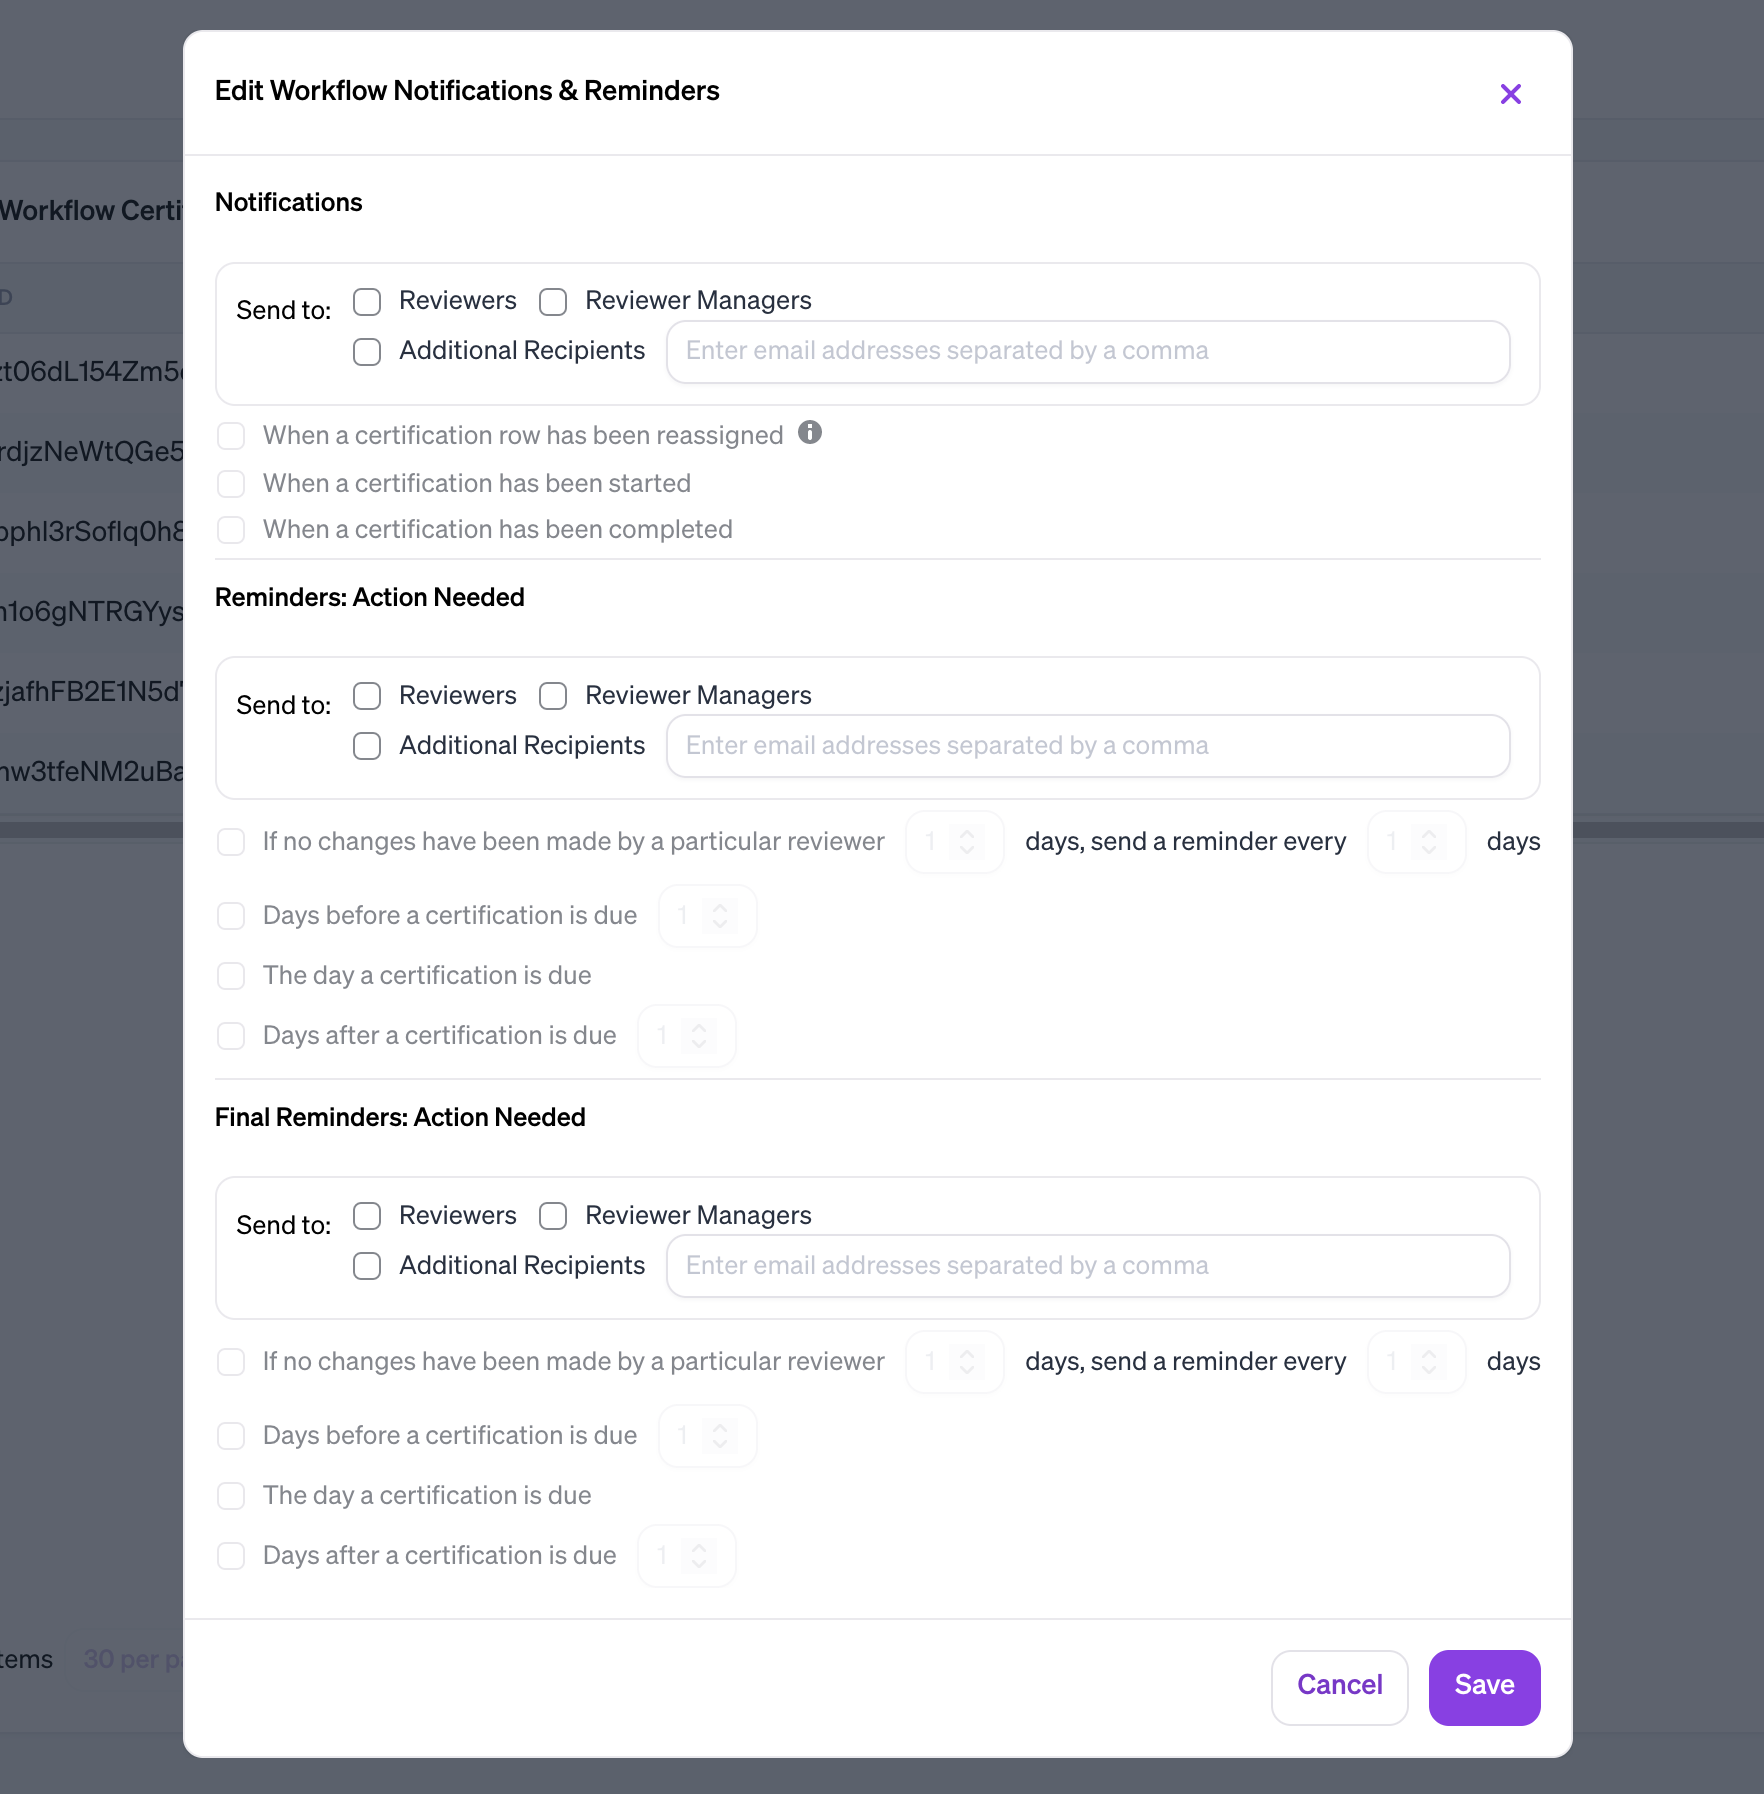
To notify reviewers by email when the certification is created, results are assigned to them, or deadlines approach, click Notifications > Edit.
For multi-user access reviews, you will typically want to configure notifications for:
Reviewers, to inform them when results are re-assigned.
Reviewers and/or additional recipients when action is needed.
You can optionally configure Final Reminders to send an escalated warning. Like Reminders, these can be configured to inform reviewers of an approaching or past deadline. See Configuring Workflows Reviewer Assignment for more information.
Step 5: Edit Orchestration Actions
Depending on which Webhooks an administrator has configured, you can trigger actions in external systems when Certification actions occur. To enable these actions, click Orchestration Actions > Configure Orchestration Actions:
If enabled, you can activate a ServiceNow Orchestraction Action when rejected rows are signed off. This can create tickets for following up on rejected results. If no Orchestration Actions are available, you can skip this step.
See Reminders and Orchestration Actions for more information.
Create a Certification
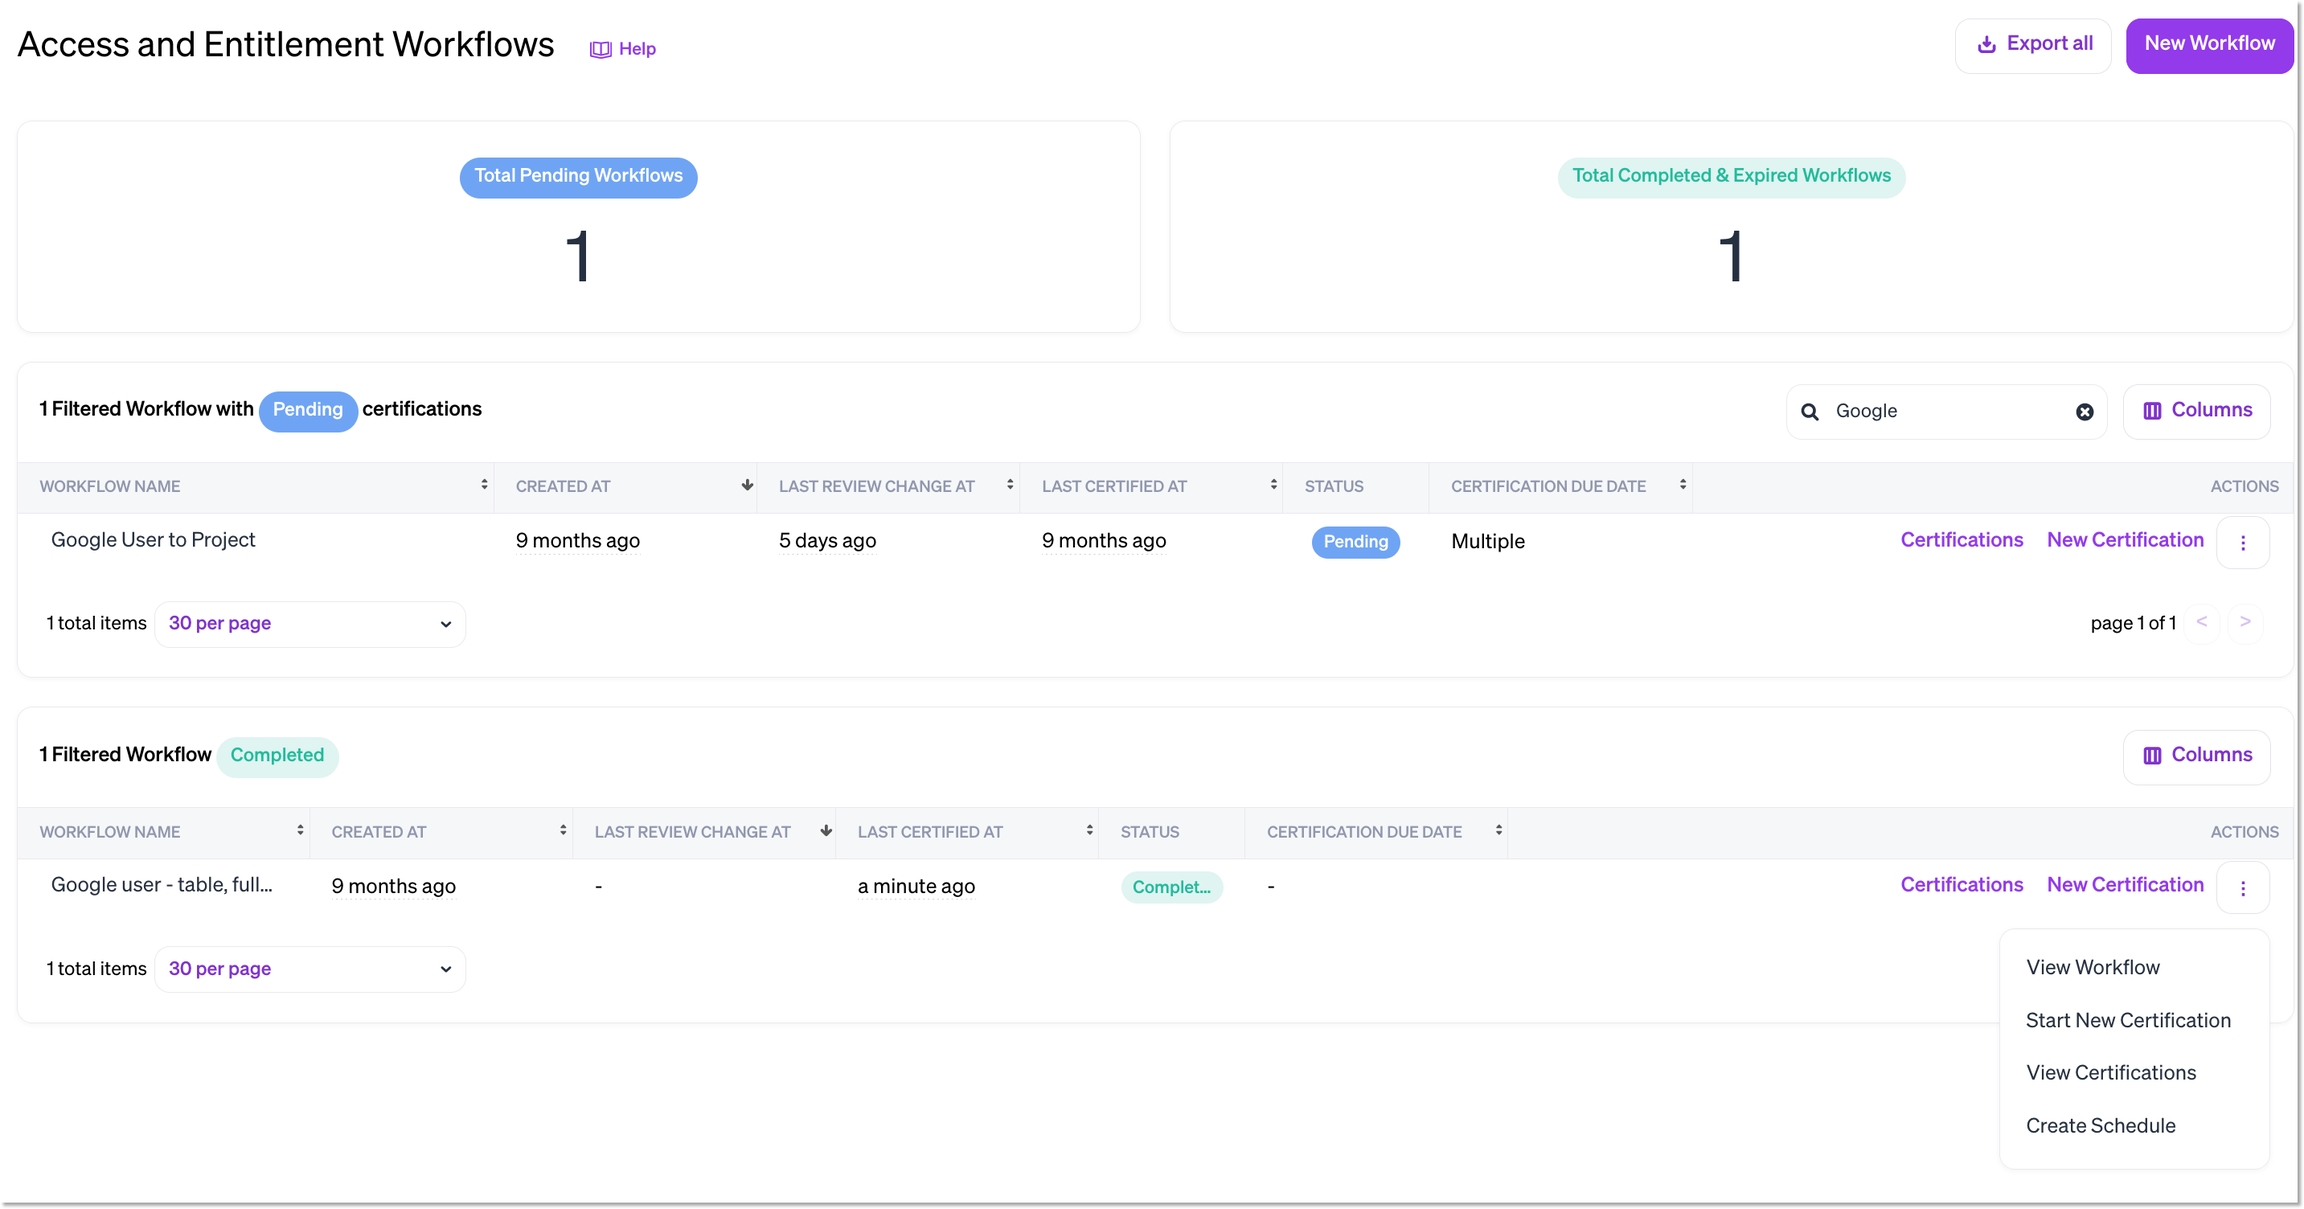
After you've saved the Workflow, it will appear on the Access Reviews page. Click New Certification to create a scheduled access review using Veza.
You can also create a Certification or review the other options such as scheduling by opening the Workflow Actions dropdown:
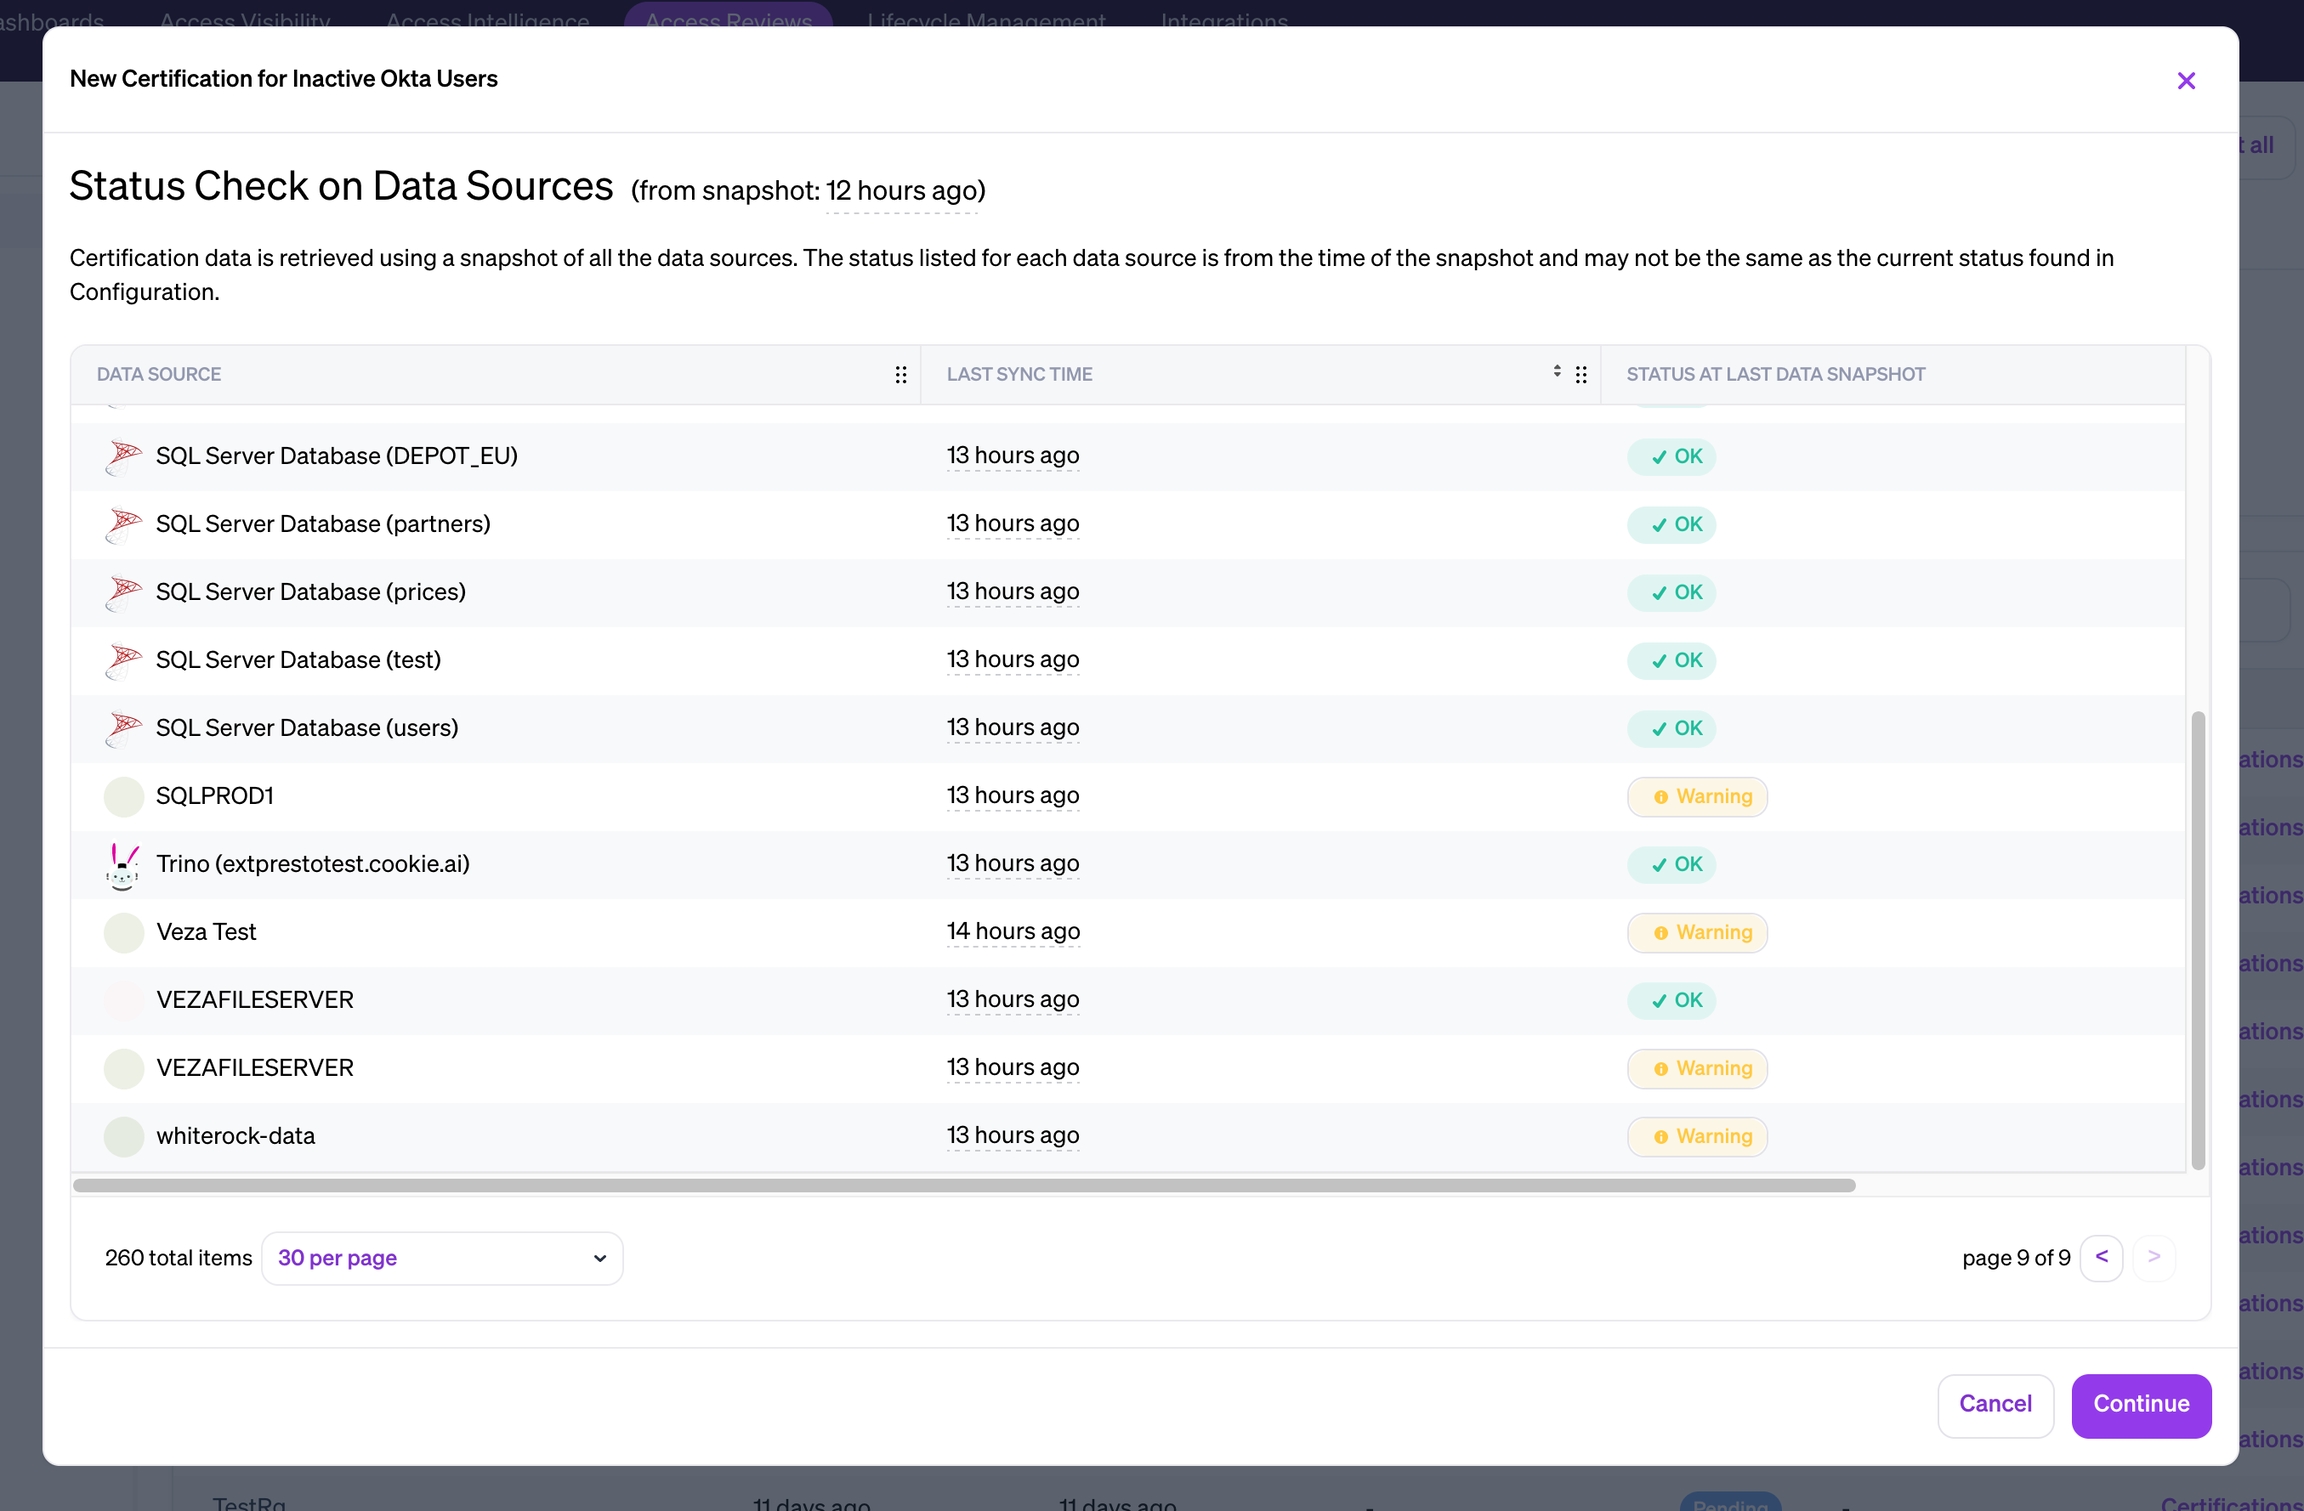
Step 1: Inspect data Sources
To ensure you are using the latest data, you must review the status of data sources related to the Workflow query before creating a Certification. Check for citical issues, and click Continue to proceed.
Note that the status report uses snapshot data, and may not reflect the latest state of all integrations. You can choose whether to use the most recent snapshot, the latest data, or historical data when configuring the certification.
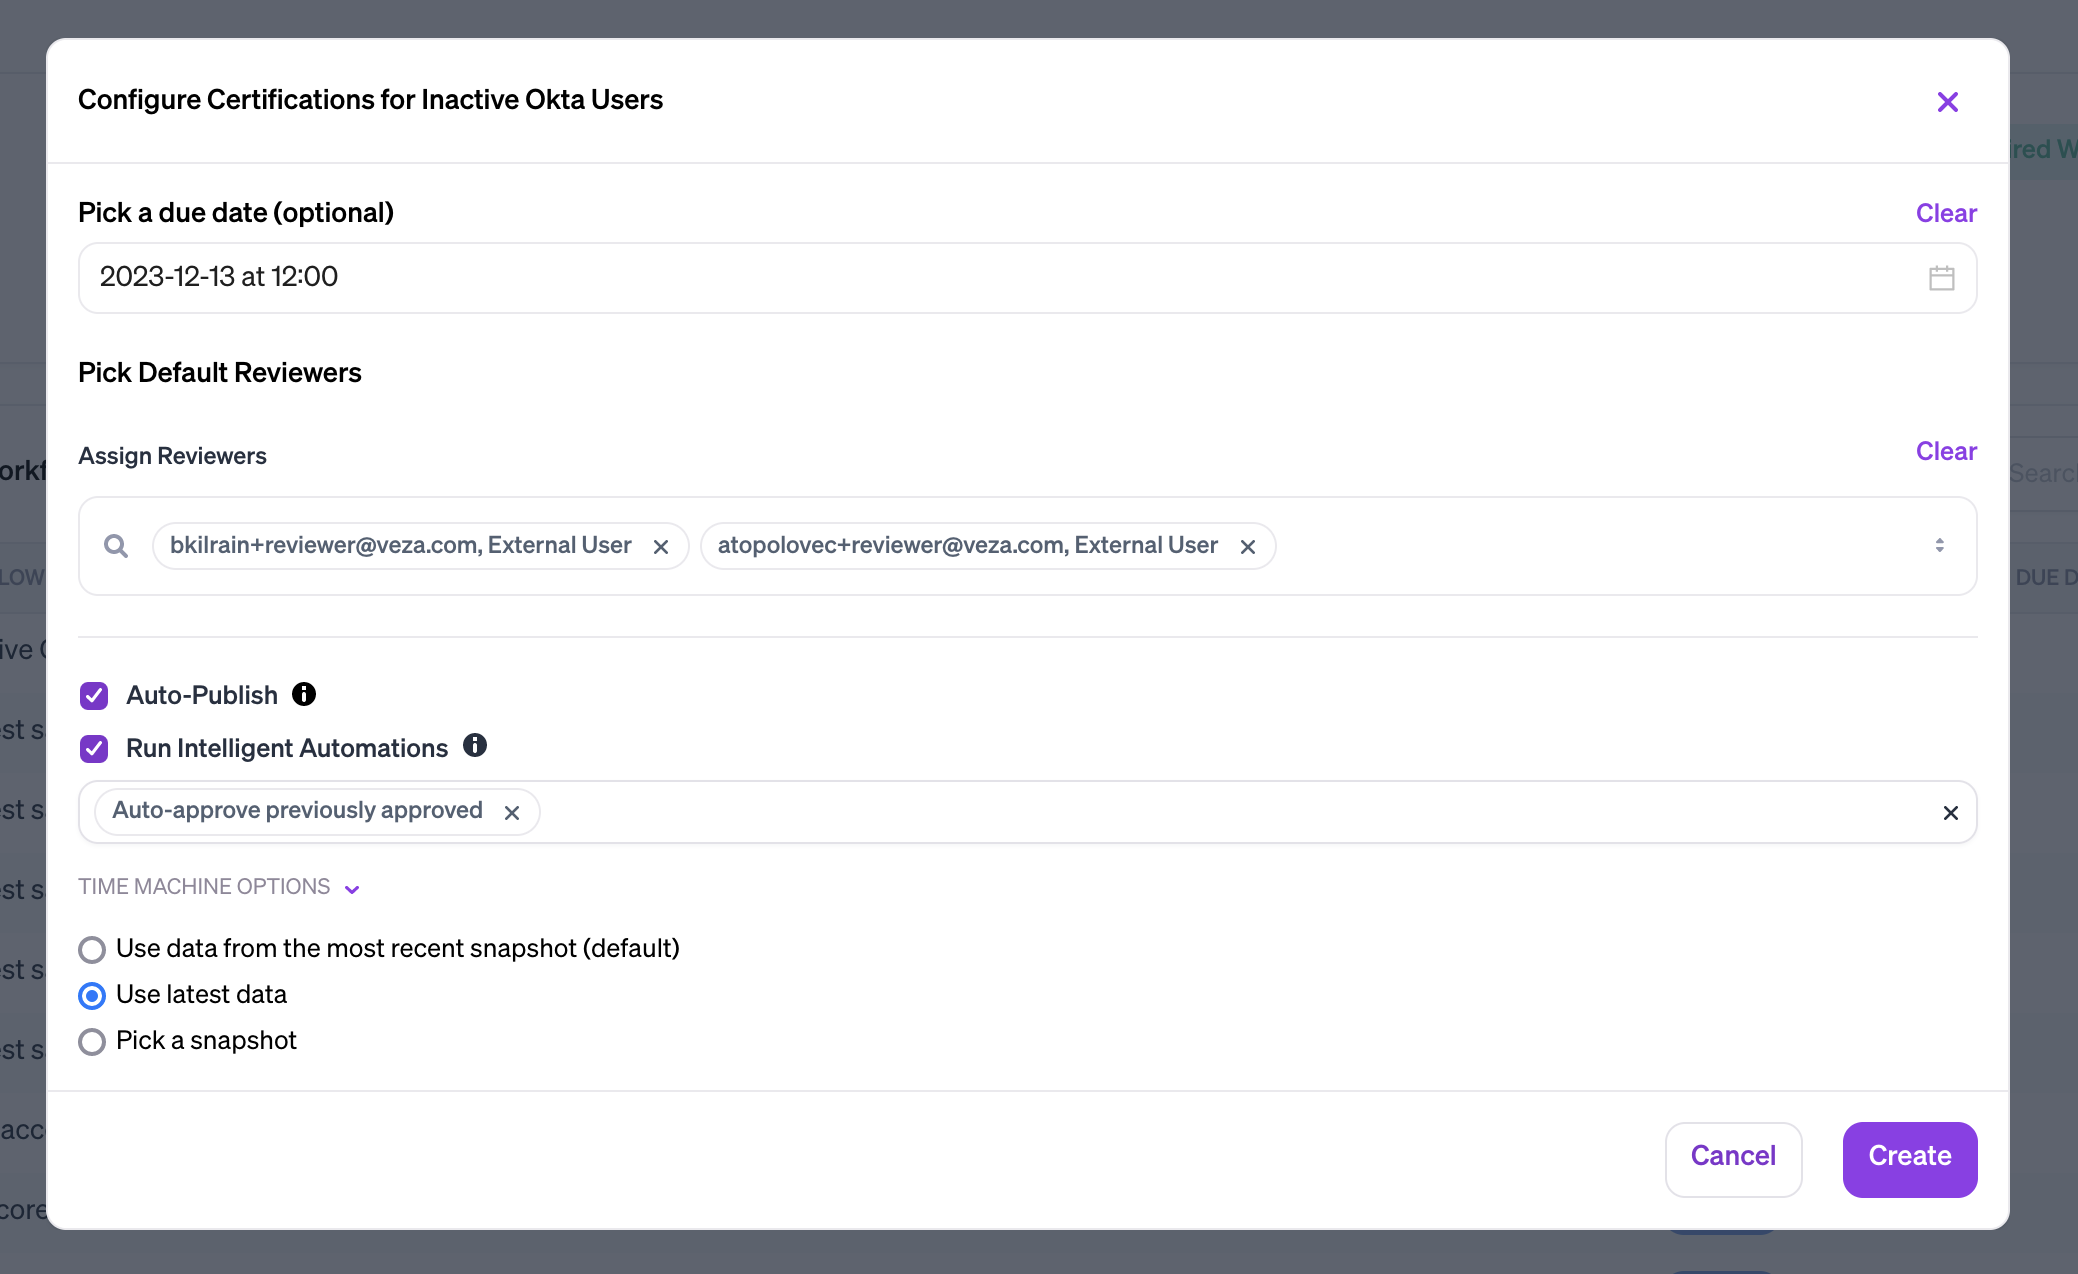
Step 2: Configure Certification
Many settings are optional when creating a certification. Use this panel to choose whether to start the certification as a draft (Auto-Publish), and the Authorization Graph data to use (Time Machine Options). You can also:
Pick a Due Date, which will trigger the notifications configured for the workflow.
Assign Reviewers for all results. By default, this is the list of Veza system users. It may include other users from your corporate identity provider depending on how Veza is configured.
Apply Intelligent Automations. These can be used to act on results that already have a decision in a previous certification, or conditionally apply other actions based on how an administrator has configured them.
For this example, de-select the Auto-Publish option, so that you can review the results and change how they are assigned before notifying reviewers.
To save the Certification and view the results, click Create. Click Continue on the list of Certifications.
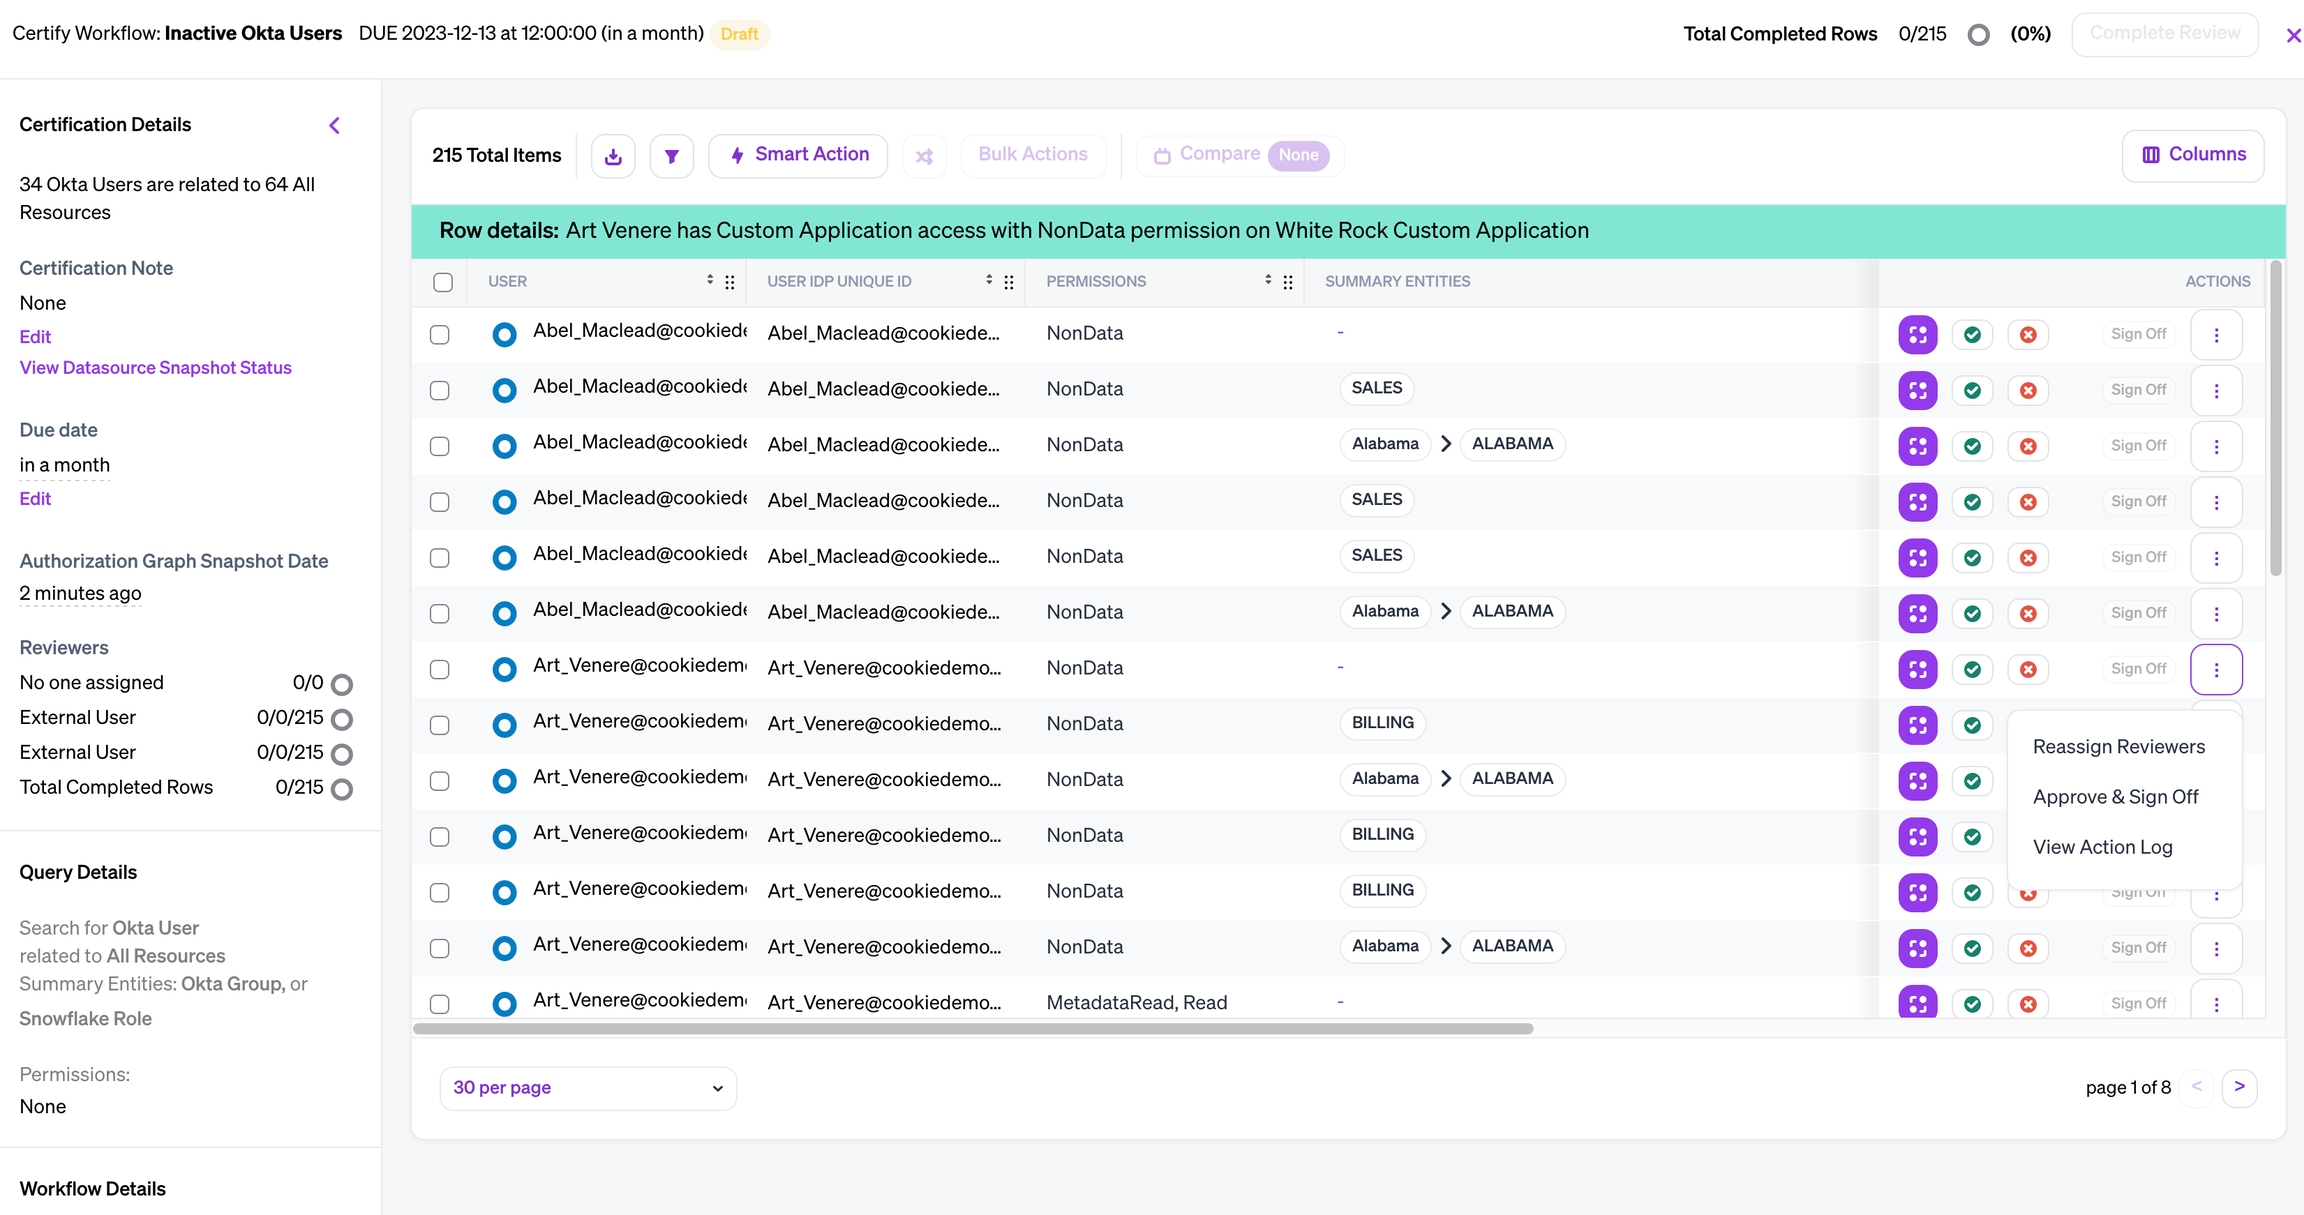
Step 3: Review Certification Results
The certification view has rows showing entity properties, permissions, and other information about a source and destination pair. For each result, reviewers will approve or reject, add notes, and ultimately sign off on each result. After signing off, no further changes can be made.
You can filter the results and resize, rearrange, or customize columns to show or hide details. Administrators and Operators can get additional information from the sidebar on the left, or hide it for better readability.
When reviewing a draft Certification, you can make changes without notifying assignees. To prepare a Certification, you might:
Assign another reviewer by clicking Actions > Reassign Reviewers. Choose another user from the dropdown list to delegate the task.
Act on some results using the Approve and Reject icons, and the Sign-Off button.
Apply a filter to inspect specific results, which you can act on with a Smart Action in the next step.
After reviewing the results, click complete the certification, adding it to the list of completed Certifications as a permanent record. Alternatively, you can close the workflow to resume at a later point. Changes are saved automatically.
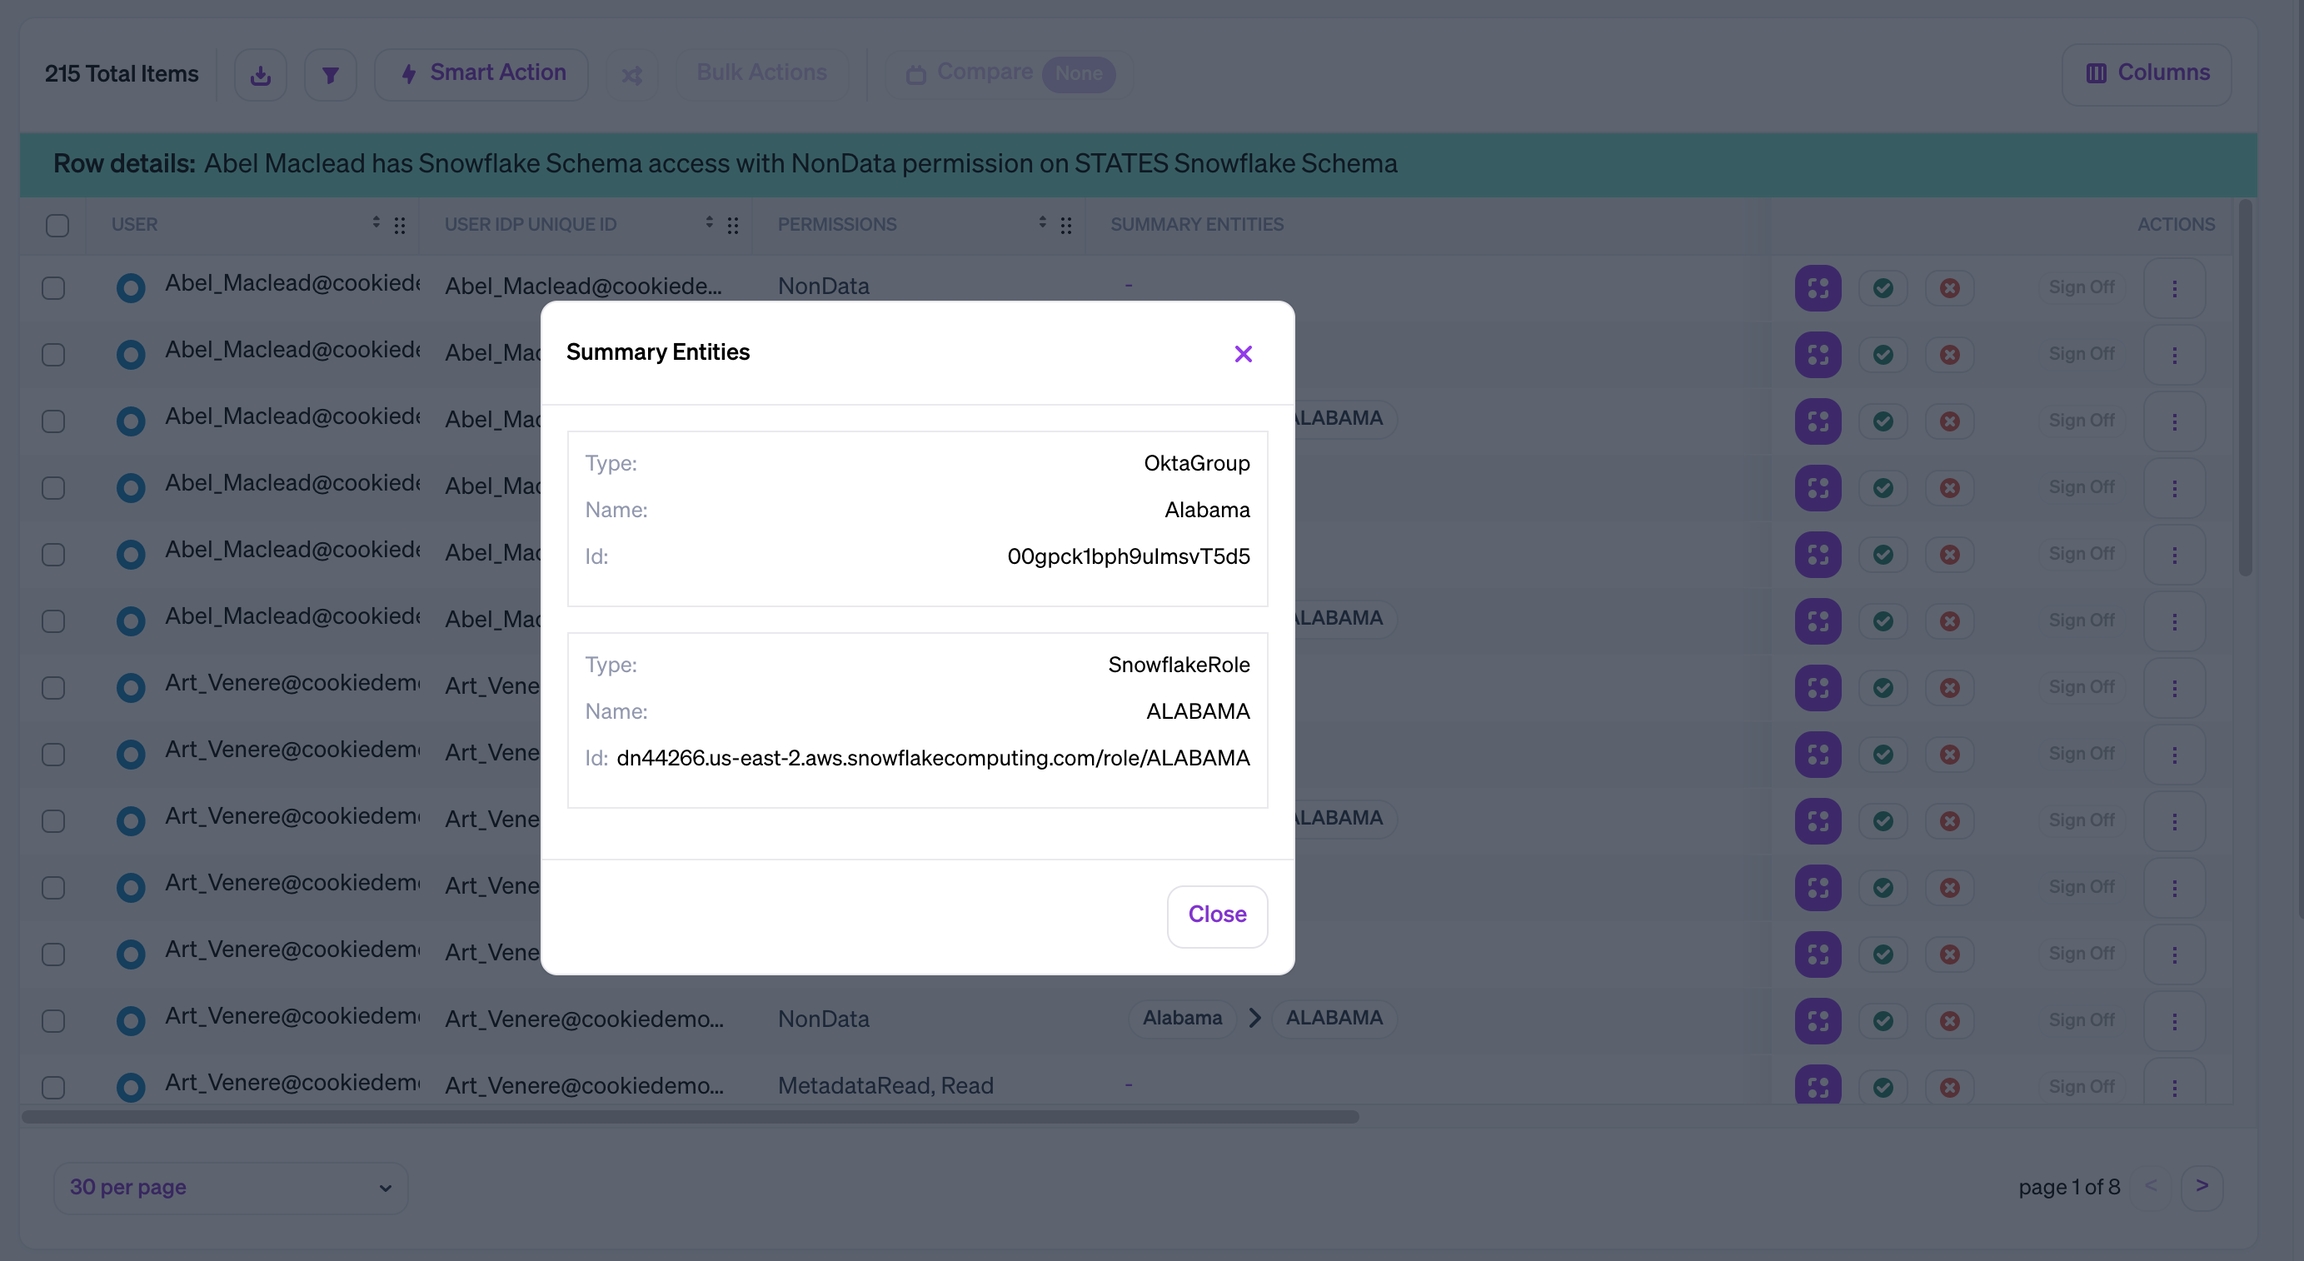
Summary Entities
The example results above include a Summary Entities column showing the Groups and Roles enabling access for a user. This enables reviewers to certify not only the permissions a user is assigned, but how that access is granted.
If a path contains multiple entities, you can click on a name to view more details, such as the entity type:
Use this column to review the path connecting the source and destination, and approve or reject results based on whether the configuration is appropriate.
Step 4: Run a Smart Action
The Veza Authorization Graph includes rich metadata to enable informed reviewer decisions. You can use this metadata to apply actions (such as assigning reviewers, applying a decision, or signing off) on all rows that match a filter condition.
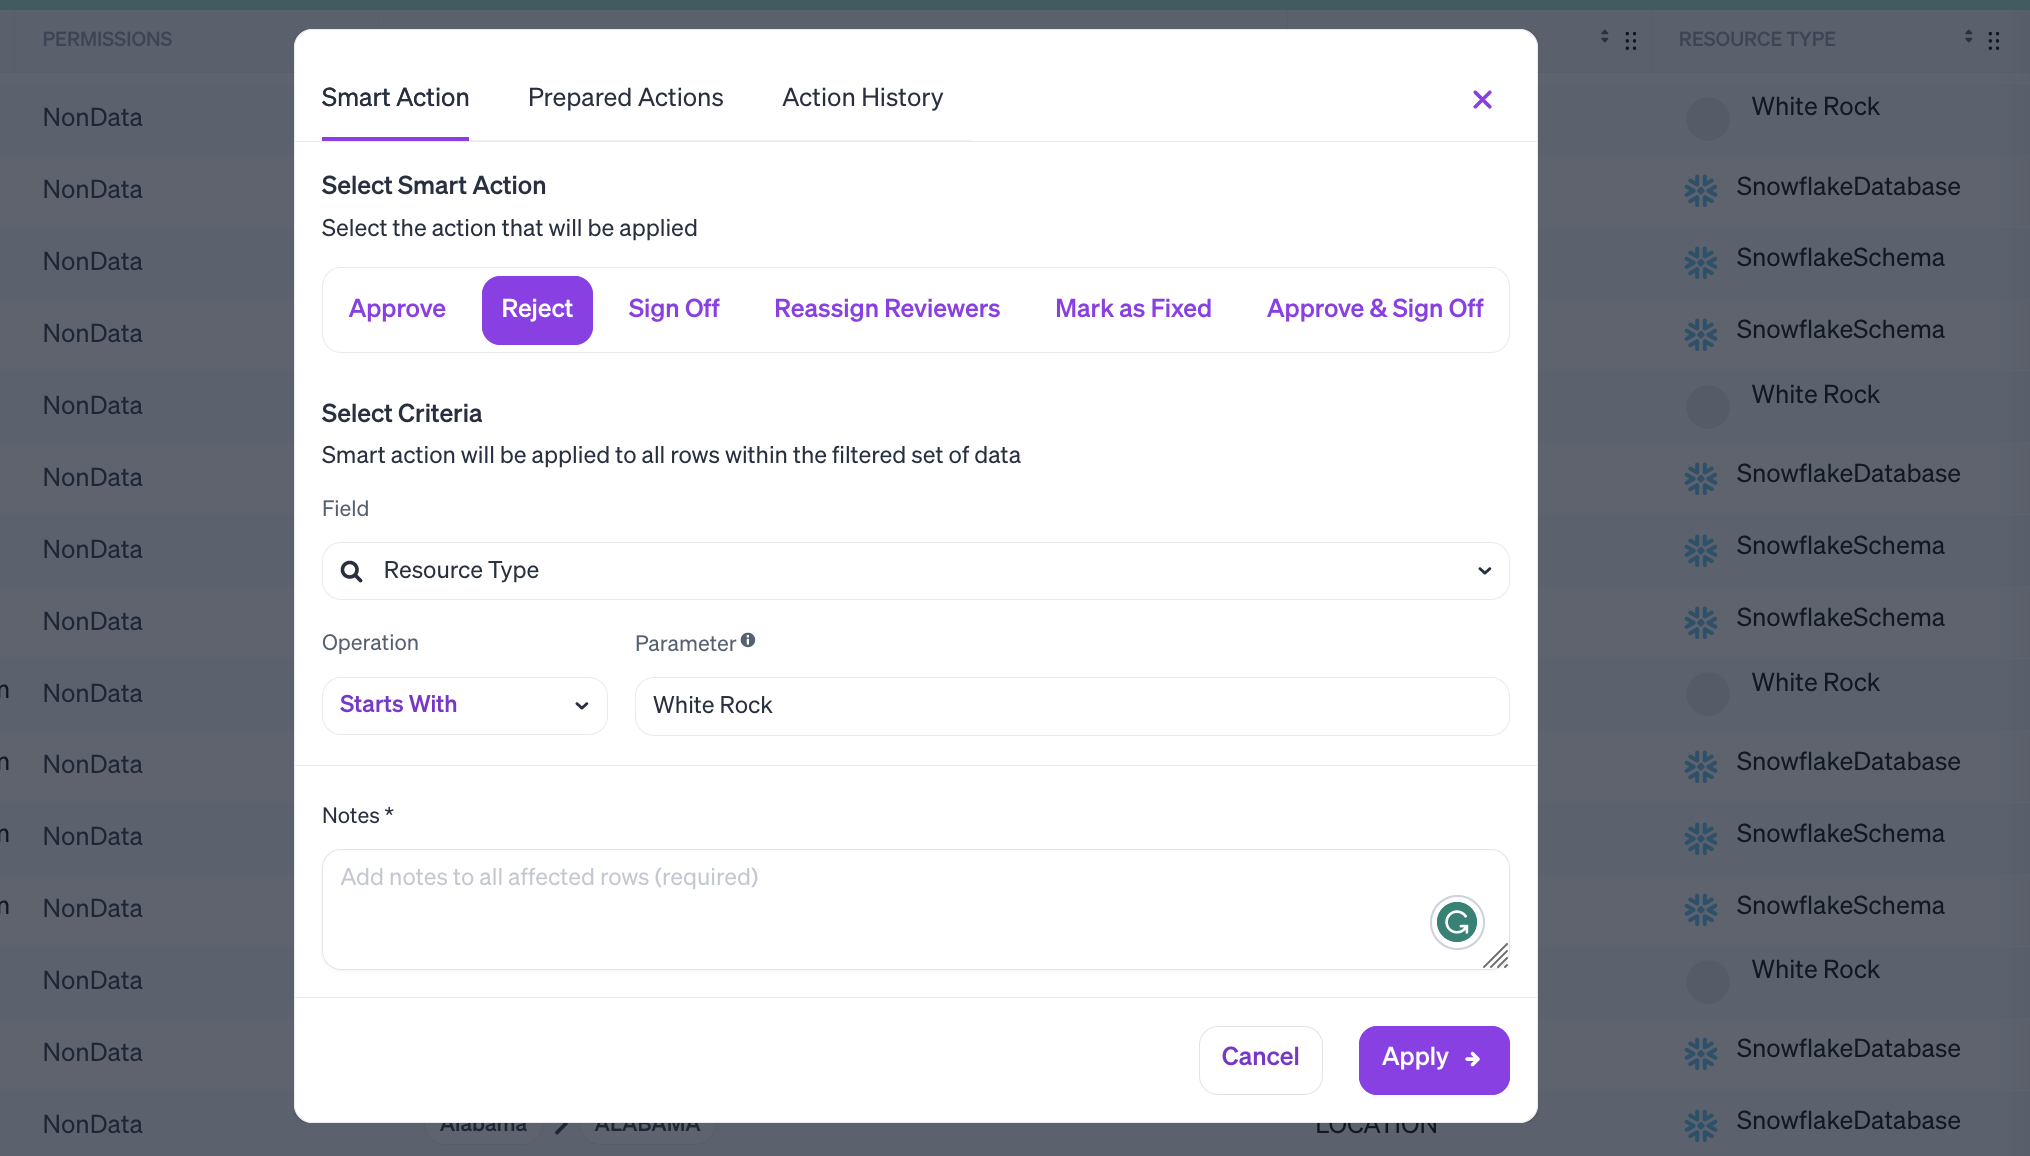
To run a Smart Action:
Check the Prepared Actions tab to see if a relevant Smart Action already exists.
On the Smart Action tab, start a new Action:
Choose the action type.
Specify the filter criteria by choosing whether to match a source or destination property.
Provide a note to apply to any results the Smart Action updates.
Click Apply to run the action.
Check the Action History tab to check the action status and get more information about updated result rows.
Typical Smart Action usage includes:
Selecting all results with a very general filter (name contains "any") to apply an initial decision or mark results as fixed after remediation.
Rejecting all results based on configuration metadata, such as whether a resource is encrypted or a user is active.
Re-assigning reviewers based on source user attributes like
departmentormanager.Applying an action to all results that match the current filter view.
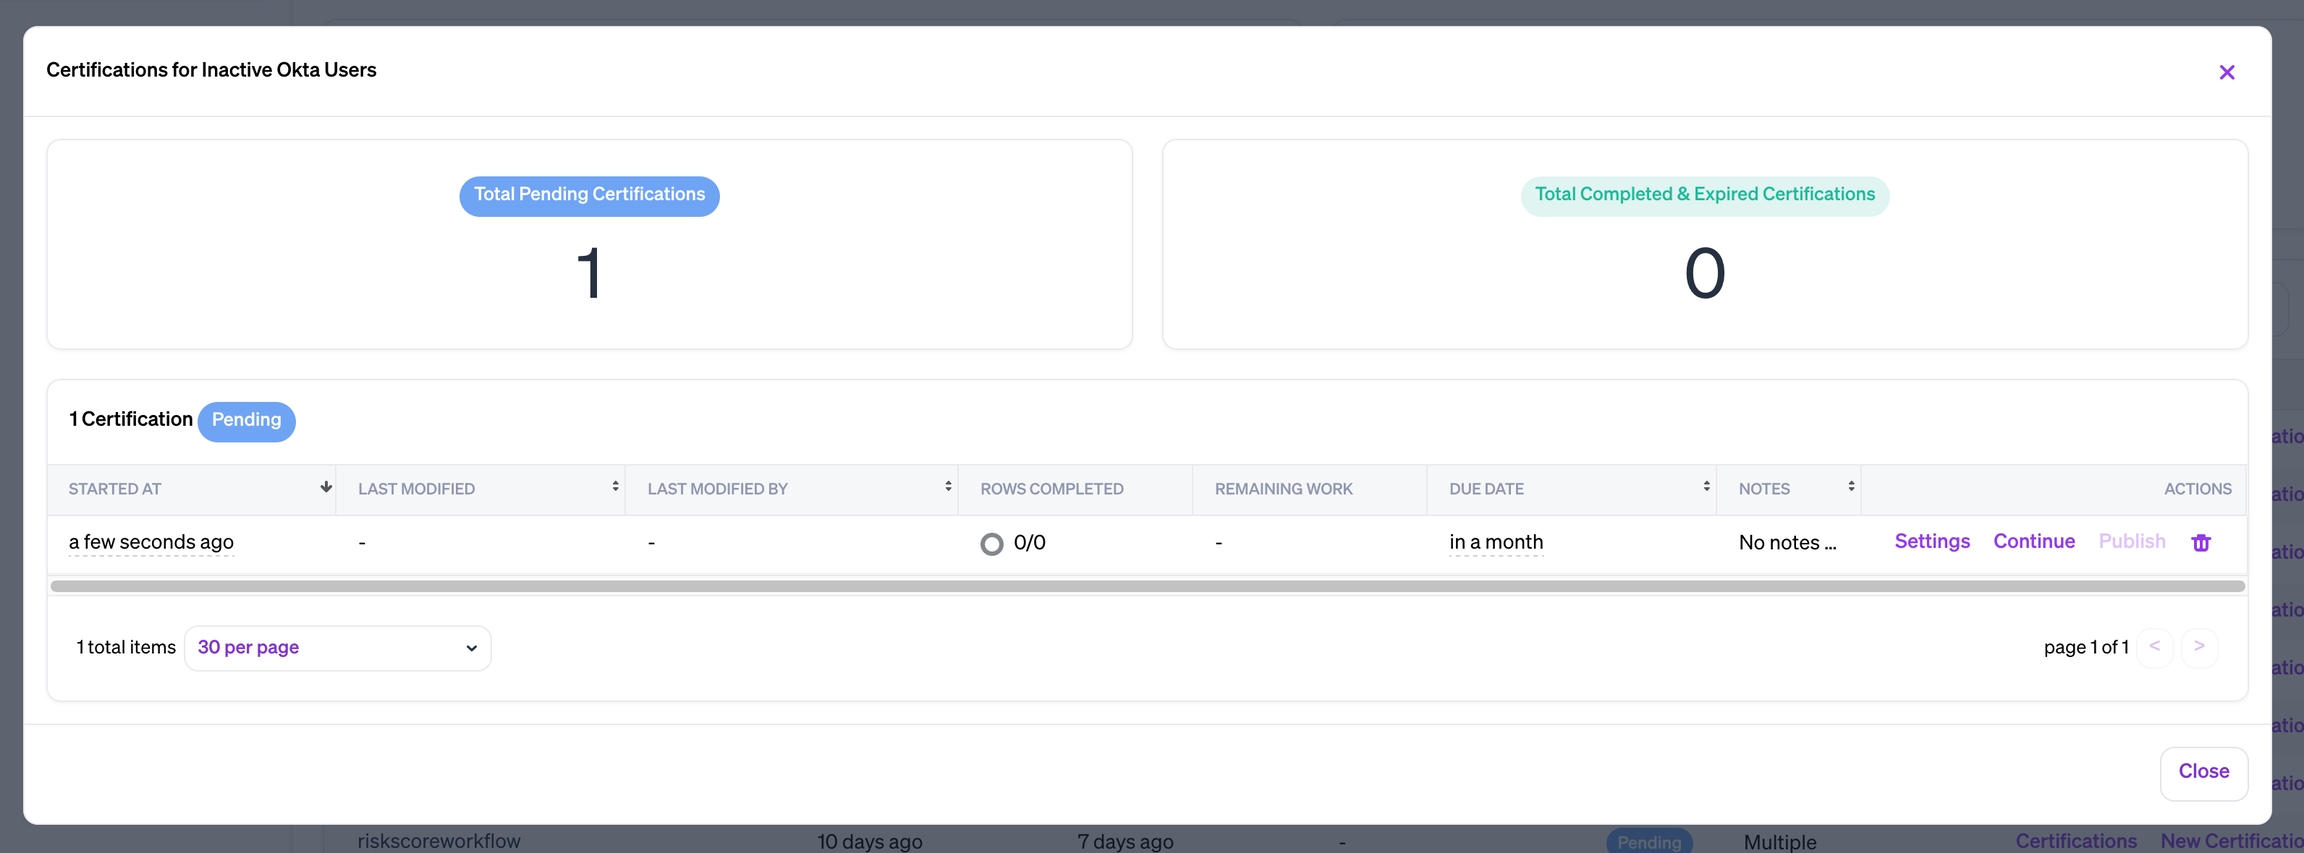
Step 4: Manage and Publish Certification
To review the certification status and settings, and publish the certification if is not auto-published:
Go to the Access Reviews page.
Use the search bar to find the Workflow to manage Certifications.
Click Certifications or use Actions > View Certifications
Use the modal to review all active and historic Certifications, with the option to continue, change settings, or publish.
Click Publish to make a Certification available to reviewers and trigger any notifications.
Learn More
Some features of Access Reviews include:
Automatic Certification Scheduling under Workflow Actions > Create Schedule.
Intelligent Automations for updating results in bulk based on filters or past decisions
Auto-assignment of eligible team and resource managers: see Reviewer Assignment Methods and Workflows Global IdP Settings
Configurable Workflow and Certification Settings and Help Page Templates that can be managed by the Veza support team or an administrator.
Access Reviews APIs for automation and customization
Please see the other topics in this section for more details on Access Reviews capabilities.
Thank you for choosing Veza Access Workflows. We're excited to support you on your journey!
Last updated